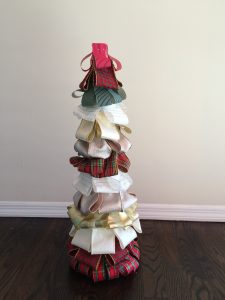
Over the weekend UltimateMama and her two little ones made beautiful holiday ribbon trees that are the talk of the town (or at least the small beach village). These inexpensive tabletop trees are keepsakes for years to come and ideal centerpieces for your holiday table. The ribbon trees only required the following:
– various types of thin ribbon (which can be poked through easily with a straight pin) with a width of at least 7/8 inches and cut into 4 inch pieces
– one longer piece of ribbon at least 5/8 inches in width that will fit along the base of your tree (to cover the white of the cone)
– one Styrofoam cone in any size you wish (you can purchase at Michaels) but UltimateMama likes at least 14 inch cones
– a package of straight pins
To assemble:
Cut the longer piece of ribbon to fit along the bottom/base (widest part) of your tree and secure it with straight pins (overlap the ends). Start with one piece of your ribbon and fold it in half and pin it with 2 pins at the top of the cone. Leave 1/4 inch of the ribbon dropping off the edge. Continue to fold each piece of ribbon and pin these pieces of ribbon right next to each other along the cone. Pat yourself on the back after you have completed a row. When you start a new row make sure you add the ribbon about an inch above the prior row and start pinning the ribbon in between 2 “bottom layer” ribbons. Make sure the cone is covered with ribbon and no whiteness of the cone is showing. Fold each 4 inch ribbon piece and pin with 2 pins until the row is complete. Then start the next row..and on and on! At the top you can wrap a piece of ribbon around the top or make a creative star.
This ribbon tree is a great holiday gift as well! You can custom make it to your recipient’s tastes by selecting ribbons with their favorite color or pattern!


