UltimateMama took her girls to the L.E.A.F. Flower Festival in NYC’s meatpacking district in early June. It was a wonderful time to be surrounded by gorgeous colors as summer was beginning.

Best of all, the girls were inspired to create their own floral arrangements using assorted varieties in beautiful old vases. All creative arrangements were admired and adored!

UltimateMama and her kids love to make simple tissue paper floral centerpieces. Easy, inexpensive, and pretty these paper flower centerpieces are the perfect addition to your dinner table or any party tablescape. To do:
-Stack 3 sheets of tissue paper on top of each other
-Cut into 12 by 6 inch pieces
-Start with the shorter side and fold into 1 inch accordion folds
-Turn the tissue paper stack over for the next fold, then turn it over for the fold after that
-Take scissors and trim the edges with rounded corners
-Place a green pipe cleaner in the middle of the folded tissue paper strip and twist the pipe cleaner to hold the tissue paper in place
-Carefully peel the tissue paper layers apart
-The “petals” will unfold and you will see it “blossom”

UltimateMama and her kids took advantage of the after holiday sales and purchased Christmas stockings at 75% off and decorated them with Tulip Soft Fabric Paint as well as Tulip Dimensional Fabric Paint which can be found 365 days a year. If painting isn’t really your thing always grab a stencil and make fun trees, snowmen, angels, or even Santa Claus himself. Crayola Fabric Markers can be used to add the finishing touches. These fun creations are inexpensive and pleasing to the eye and will last you forever…or until next year when your child wants to make a new one!

Over the weekend, UltimateMama and her two children had a nice one hour shopping trip to stock up on holiday goods and craft supplies at Michaels. Killing time as it rained on Long Island was quite easy as UltimateMama challenged her family to come up with a gorgeous holiday tablescape that was pleasing for all ages and works for either a dining or side table. Mission accomplished with the 70% off doorbuster promotions at Michaels. Best of all the total cost was under $25! The breakdown:
Potted red poinsettia with gold foil (artificial): $6 (from $20)
Metallic garland: $3.60 (from $12)
Small champagne tabletop sisal tree: $6 (from $20)
Large champagne tabletop sisal tree: $7.50 (from $25)
Total cost: $23.10
Happy Holidays!

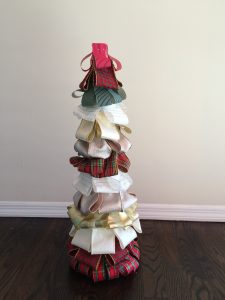
Over the weekend UltimateMama and her two little ones made beautiful holiday ribbon trees that are the talk of the town (or at least the small beach village). These inexpensive tabletop trees are keepsakes for years to come and ideal centerpieces for your holiday table. The ribbon trees only required the following:
– various types of thin ribbon (which can be poked through easily with a straight pin) with a width of at least 7/8 inches and cut into 4 inch pieces
– one longer piece of ribbon at least 5/8 inches in width that will fit along the base of your tree (to cover the white of the cone)
– one Styrofoam cone in any size you wish (you can purchase at Michaels) but UltimateMama likes at least 14 inch cones
– a package of straight pins
To assemble:
Cut the longer piece of ribbon to fit along the bottom/base (widest part) of your tree and secure it with straight pins (overlap the ends). Start with one piece of your ribbon and fold it in half and pin it with 2 pins at the top of the cone. Leave 1/4 inch of the ribbon dropping off the edge. Continue to fold each piece of ribbon and pin these pieces of ribbon right next to each other along the cone. Pat yourself on the back after you have completed a row. When you start a new row make sure you add the ribbon about an inch above the prior row and start pinning the ribbon in between 2 “bottom layer” ribbons. Make sure the cone is covered with ribbon and no whiteness of the cone is showing. Fold each 4 inch ribbon piece and pin with 2 pins until the row is complete. Then start the next row..and on and on! At the top you can wrap a piece of ribbon around the top or make a creative star.
This ribbon tree is a great holiday gift as well! You can custom make it to your recipient’s tastes by selecting ribbons with their favorite color or pattern!

UltimateMama needed a new summer centerpiece for her dining table this year and wanted something simple, elegant, and modern. Additionally, she wanted to create it with materials around the house to keep the cost down and wanted her girls involved in the process. After a 15 minute tour of her craft supply UltimateMama selected the following:
– A glass cube from a flower arrangement that was sent to her earlier in the year
– A bouquet of artificial silk white roses from a bridesmaid’s floral arrangement at UltimateMama’s wedding years ago
– Shells in various sizes and shapes that were bleached/cleaned from last summer
The result: a fabulous, long lasting, beautiful centerpiece that already received many compliments. So many in fact that UltimateMama made 2 of them for her long table!


UltimateMama put her girls to work to create the ultimate holiday tablescape with an ocean feel! Just fill an empty flower vase with bleached shells and you will have the perfect “beach” addition to your festive table. Kids any age can join in on the fun!
UltimateMama and her girls ventured to M&J Trimming last week in the quest to find goods to use to create our own barrettes and hair accessories! And, were we ever successful (after about an hour of looking through all of the store’s amazing supplies). First, we headed straight to the clearance section to find beautiful appliques of all kinds at spectacular prices ($1 to $3 each). Next, we found bags of 4-5 hair clips (medium and large in size) in each pack. Finally, our eyes locked in on E6000 craft glue. It only took us 30 minutes to glue on the appliques and create red carpet worthy hair barrettes that have become a big hit at school!


Easy, fun, cute, and useful!
UltimateMama believes the greeting card is (sadly) going the way of the rotary phone. Still a believer in sending a nice hand written message, it was delightful to discover The Orb Factory Sticky Mosaic Pretty Cards kit for kids. UltimateMama’s two children had fun creating cards for their friends. The cards are easy to do (just peel and stick) and they look terrific too.

UltimateMama loves to involve her children with the creation of tablescapes, preferably ones that have meaning. Using shells your children have collected from vacations and placing them into clear glass jars is a nice, inexpensive way to display a souvenir of fun times and create a tranquil setting for your table or countertop.
To do:
1. After your children have collected various shells in myriad colors, shapes, and sizes, you will want to bleach them in a solution of half bleach and half water (usually without the help of your youngsters). This way the smell is eliminated (if you don’t smell the odor of your shells immediately, you will if you don’t bleach them).
2. Select a clear glass vase or jar. UltimateMama found this glass jar with lid below in a thrift shop for $1. Open vases work well too.

3. Have your children look at the shells and decide which ones should go into the jar or vase and fill away!
4. Display your souvenir shell project as a lovely tablescape.
5. Enjoy it every day.


